Showing posts with label Moebius Models. Show all posts

Monday, June 23, 2008

Then Voyager

During my trip to Red Bank, NJ, a few weeks ago, I managed to find the new Voyager model kit from Moebius Models. Not to be confused with the Star Trek series, this Voyager is the vehicle used in the animated version of Fantastic Voyage. As you may recall, the Fantastic Voyage motion picture used a miniaturized submarine called the Proteus to travel through the veins and arteries of the human body. For the animated spin-off, the crew needed a more versatile means of transport which could take them anywhere their tiny hearts desired, hence the snazzy aircraft. You can watch a full episode from the series here.


As a kid, I loved both the movie and the TV series and always wanted model versions of both the Proteus and the Voyager. Unfortunately, unless I'm mistaken, no one ever made any. I did find a resin model of the Proteus online a few years ago, but when it arrived at my house, some of the brittle resin parts had already broken and it just seemed to heavy and fragile for me to build without some major cursing. It's still unassembled. Recently, however, this new plastic kit of the Voyager was released, and I'm thrilled to report that the kit is a wonderful rendering of the flying machine.


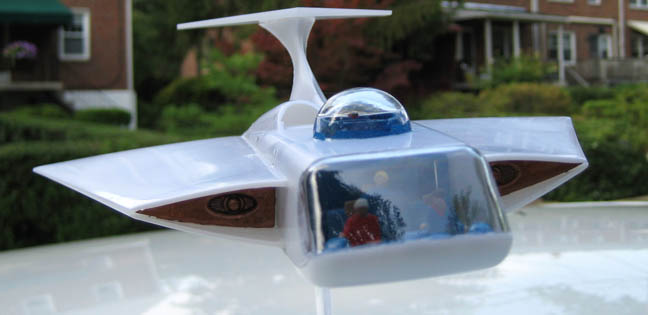
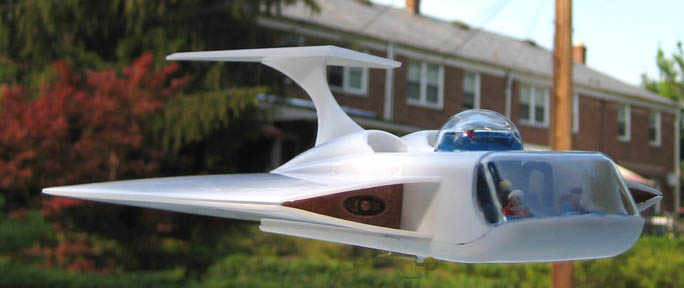
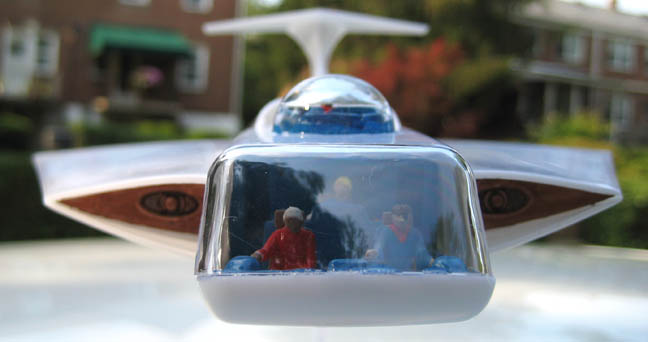
Immediately, I was excited to discover that the ship's interior is recreated in exact detail including all four crew members: Commander Johnathan Kidd, Pilot Busby Birdwell, Indian Mystic Dr. Guru, and resident hot babe Erica Lane. I had a lot of fun painting those tiny figures, right down to Kidd's eye patch and Birdwell's spectacles. I was worried that all my painstaking efforts would disappear once the kit was assembled, but the front windshield and overhead dome provide ample portholes through which to see the interior.


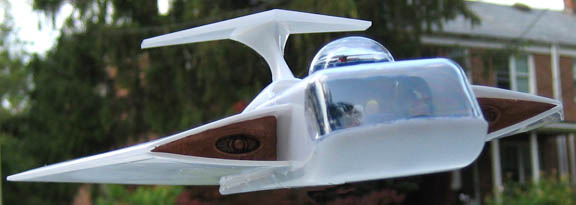
The outer body is relatively paint free since the ship on the series was plain white. I decided to paint the motor intakes a bronze color to make them appear more realistic and provide a pop of color to the front. For the back, I painted an orange glow effect inside each of the exhaust ports. Otherwise, I stayed true to the basic white look from the animated series.


In keeping with Moebius's attempt to mimic the Aurora model kits of old, the air craft comes with a stand which holds the Voyager aloft in a flying position. The stand even has the obligatory decal of the vehicle's logo. Every time I built one of these Aurora-esque models, I get a twinge of excitement like I'm 8 years old all over again. Moebius provides assembly instructions that look just like the old Aurora instruction sheets. The box art, while still trying to look Aurora, is a bit low rent with a spray painted styrofoam ball with nails stuck in it hanging in the background like some crude atomic particle or something. Oh well, the kit is still nice.


I've enjoyed just staring at this new model. I keep dreaming of how much fun it would've been to have this kit when I was young. What adventures we would've had... until I accidentally smashed it against a wall or dropped it down a stairwell.

Monday, March 24, 2008

NEW CAPTAIN ACTION MODEL FROM MOEBIUS

Moebius Models, in conjunction with Captain Action Enterprises, has finally released their long-awaited Captain Action model, a reproduction of the original Aurora model issued in the late 60s. The model kit mimics the original in every detail possible, from the box art to the instruction sheet provided inside, but Moebius also provides some added options for those Captain Action fans who were never quite happy with the original.

When Captain Action Enterprises first announced that the kit was in development, one issue that was discussed on the Yahoo! Captain Action list was the fact that the face on the original model did not look like the action figure or the artwork on the box. In fact, it didn't look like much of anything with its bland, simplistic features more at home on a totem pole than a figurine. In response to this criticism, Moebius Models enlisted Terry Beatty to create an alternative face sculpt which looked more like the actual artwork on the box.

A second alternative element was the creation of a nameplate for the base which used the familiar Captain Action logo. The nameplate provided with the original model used a rather bland font, perhaps to suggest a hand-chiseled design like an actual stone sculpture. At any rate, the modeler has the option of building the model with the original face and nameplate, or use the alternative elements.

I pre-ordered two kits since I wasn't sure whether I wanted to build the original version, the alternative version, or both. Due to production delays, I waited almost a full year before finally receiving my two kits, but I think it was well worth the wait. After opening one of the kits and examining the pieces, I chose to build the alternative version. While I'm not entirely convinced that the new face looks exactly like the box art (and it's certainly nothing like the action figure), it's still a much more interesting face than the dead-behind-the-eyes original.

These kits are limited editions with only 1,000 being made, so the price was far higher than your usual hobby shop kit. Therefore, I was determined to take my time and build the thing properly. Mind you, I've built many a model kit over the years and I think I'm pretty competent at it, but I can also make some messy mistakes when I get over eager and rush along in a mad dash to get it completed. The kit comes with an instruction sheet, designed by CA fan Jim Alexander, which looks remarkably like the old Aurora instruction sheets while incorporating details about the new elements. The sheet tells you to follow their point-by-point instructions to assemble the model correctly, but I have one word of advice there:

The instructions tell you to assemble the upper body section, then the lower body section, and glue the two assembled sections together. Trouble is, the bottom part of the upper body assembly has pegs which fit into holes along the top of the lower body assembly. If you allow your two assembled body pieces to thoroughly dry before fitting them together, you can't fit the pegs into the holes. I would suggest instead to assemble the lower body section first. Next, glue the face piece to the back part of the upper body, and then glue the front and back pieces of the upper body assembly together while simultaneously fitting the two halves to the assembled lower section. Otherwise, you'll have to pry the two sections apart again to glue them to the lower section. I was lucky and was able to fix the problem without damaging the pieces, but not everyone may be so lucky, so you have been warned!

Other than that small quibble, the model came together fairly easily and was a fun project. Although there are relatively few pieces, it is a big model and will require some time to paint and assemble. Be sure that you make sure pieces are securely glued together before moving on with assembly as the sheer weight of these large sections can cause them to fall out of position.

So, after 40 years of lamenting the fact that I would never have a Captain Action model to build, I finally have one to call my own, and I think it's a big improvement over the original. I'm so grateful to Moebius Models and Captain Action Enterprises for making this rare model kit accessible to those with modest budgets!